Some vibration during the spin cycle is completely normal. During this stage, the drum rotates at very high speeds—often between 1,000 and 1,600 RPM—to remove water from clothing.
However, a washer that shakes violently, walks across the floor, bangs against nearby walls, or produces unusually loud noises usually has an underlying cause that should be checked.
In many cases, the problem is surprisingly simple. An uneven load, an unlevel washer, or shipping bolts left in place after installation are among the most common reasons. Starting with these basic checks can often solve the problem without professional repairs.
Quick Summary of Common Causes
| Common Cause | Difficulty to Fix | How Common |
|---|---|---|
| Unbalanced laundry load | Very Easy | Very Common |
| Washer not level | Easy | Very Common |
| Washing one bulky item | Very Easy | Common |
| Shipping bolts still installed | Easy | Common on newly installed washers |
| Loose leveling feet | Easy | Common |
| Flexible or uneven floor | Moderate | Occasional |
| Worn suspension rods or shock absorbers | Moderate | Common as washers age |
| Damaged drum support springs | Difficult | Less Common |
| Worn drum bearings | Difficult | Less Common |
Most vibration problems are related to installation or loading rather than a major mechanical failure. Checking the items below is often the quickest way to identify the cause before arranging professional service.
9 Common Reasons Your Washing Machine Shakes During the Spin Cycle
1. The Laundry Load Is Unbalanced
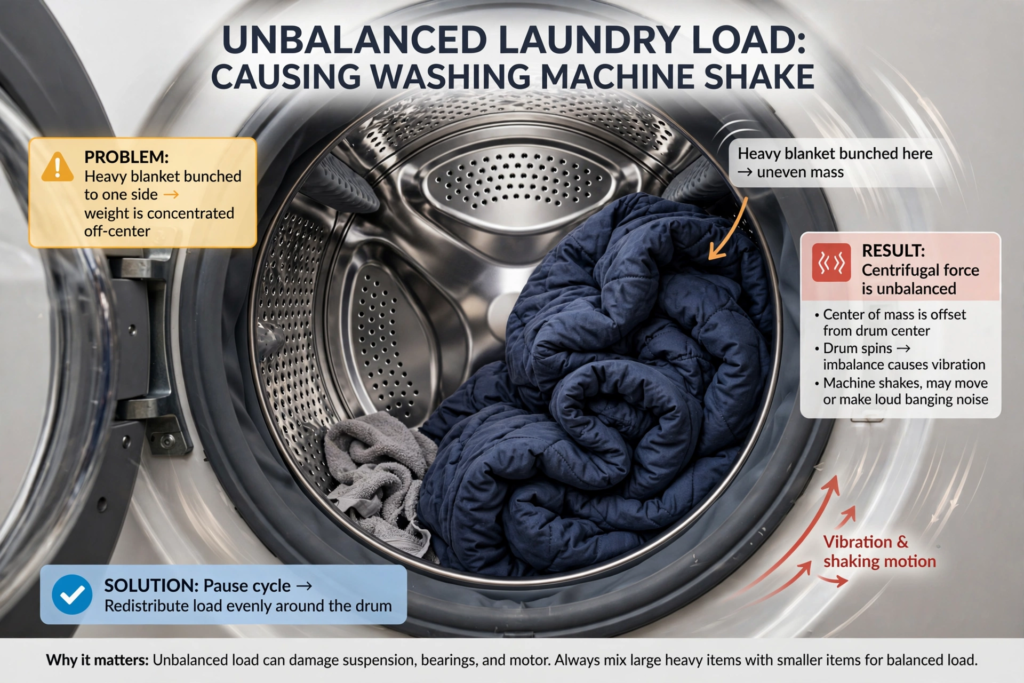
This is the most common reason a washer shakes during the spin cycle.
Large items such as blankets, comforters, bath mats, or heavy towels can bunch together on one side of the drum. As the drum accelerates, the uneven weight creates strong vibration.
If this happens:
- Pause the cycle if it is safe to do so.
- Redistribute the clothing evenly around the drum.
- Restart the spin cycle.
Many modern washers automatically reduce spin speed when they detect an unbalanced load, but severe imbalance can still produce noticeable shaking.
2. The Washer Is Not Level
Even a balanced load can cause vibration if the washer is not sitting level on the floor.
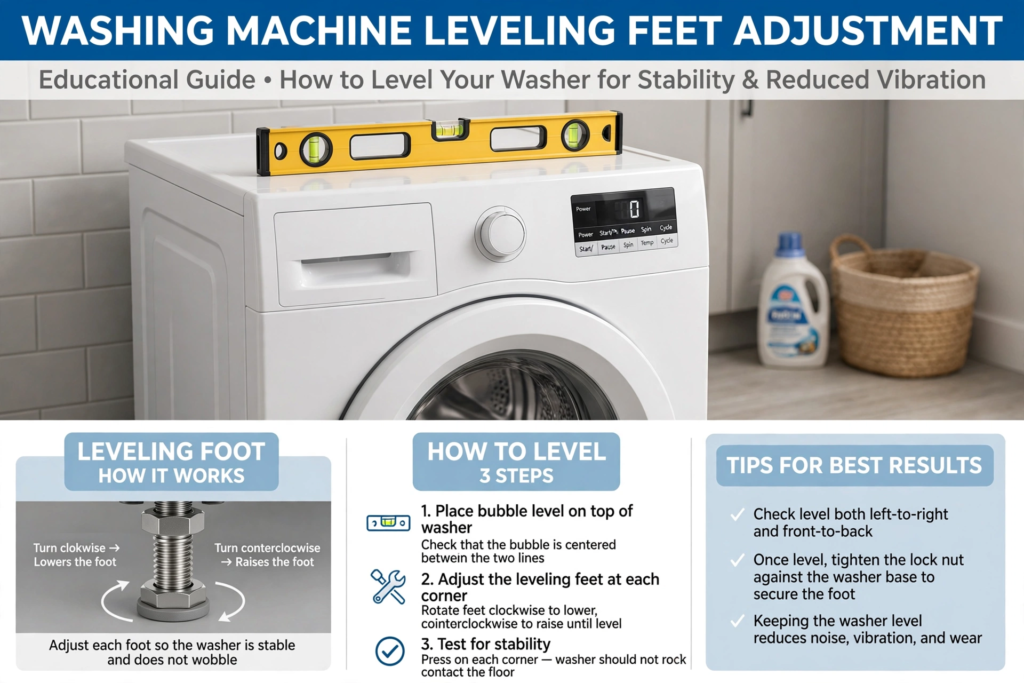
Place a bubble level on top of the washer and check both side-to-side and front-to-back.
If necessary:
- Adjust the leveling feet.
- Make sure all four feet are firmly touching the floor.
- Tighten the locking nuts after leveling.
The washer should feel stable when you press down on each corner.
3. Washing One Heavy Item by Itself
A single bulky item often becomes waterlogged during the wash.
Because the weight is concentrated in one area, the drum may become unbalanced during high-speed spinning.
Whenever possible, wash bulky items together with several similar-sized towels to help distribute the weight more evenly.
4. Shipping Bolts Were Not Removed
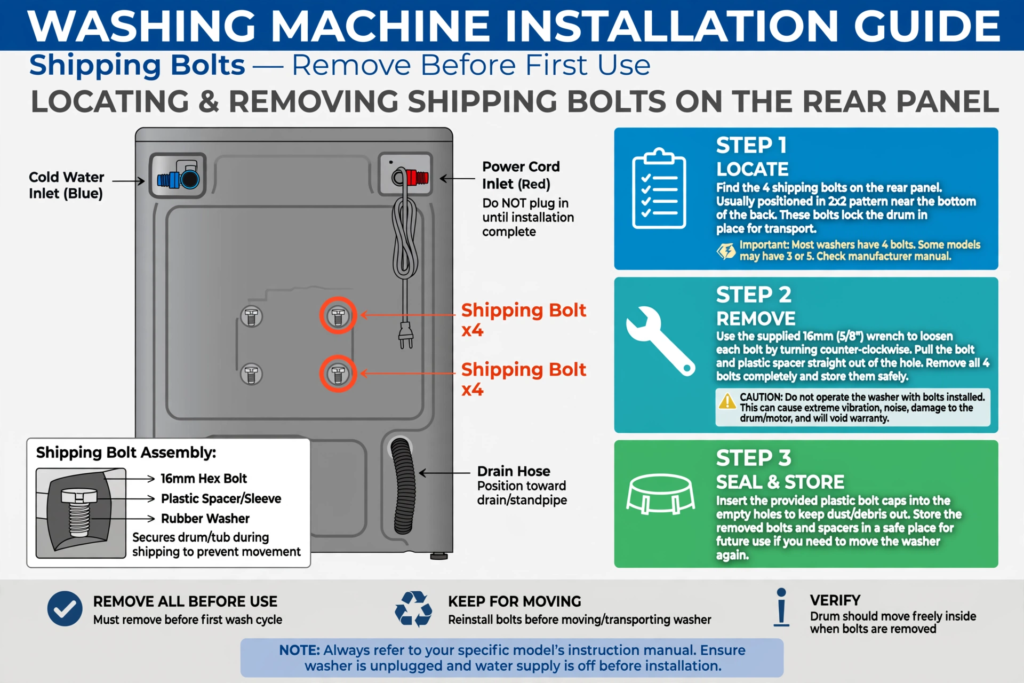
If your washer is newly installed, check whether the shipping bolts have been removed.
Front-load washers are typically shipped with several bolts that hold the drum securely during transportation. Operating the washer with these bolts still installed can cause severe vibration and may damage internal components.
Follow the installation instructions provided for your specific model before removing them. Manufacturers such as Whirlpool, Maytag, and Samsung all include guidance on locating and removing shipping bolts during installation.
Keep the removed bolts in case the washer needs to be transported in the future.
5. Suspension Rods or Shock Absorbers Are Wearing Out
Washers use suspension components to control drum movement during high-speed spinning.
Many top-load models use suspension rods, while many front-load washers use shock absorbers.
As these parts wear over time, the drum may bounce more than it should, especially during heavy loads.
This type of wear is more common in older washers or machines that are frequently overloaded.
6. The Floor Is Flexible or Uneven
The washer itself may be working normally, but the floor underneath it can amplify vibration.
This is more likely if the washer is installed on:
- Older wooden floors
- Upper-story laundry rooms
- Slightly uneven flooring
Anti-vibration pads may help reduce minor movement or noise on smooth floors, but they cannot correct an installation problem or replace worn suspension components.
7. The Leveling Feet Have Loosened
Years of vibration can gradually loosen the adjustable feet.
If the washer has recently started shaking more than usual, check that:
- Every foot is firmly contacting the floor.
- The locking nuts remain tight.
- The washer no longer rocks when pressed.
This quick inspection only takes a few minutes and may solve the problem.
8. Drum Support Springs Are Damaged
Some washing machines use heavy-duty springs to help stabilize the drum.
If one of these springs stretches or breaks, the drum may tilt excessively during the spin cycle, causing strong vibration and loud banging.
Because replacing these springs usually requires partial disassembly, this repair is generally better left to a qualified appliance technician.
9. Drum Bearings Are Worn
Worn drum bearings usually cause more than vibration alone.
Common symptoms include:
- Loud roaring or grinding noises
- Increased vibration during high-speed spins
- Water leaking near the rear of the drum
Bearing replacement is a more extensive repair that normally requires significant disassembly of the washer.
How to Stop a Washing Machine From Shaking
Before assuming something is broken, work through these simple checks. Most vibration problems are caused by installation or loading issues rather than failed parts.
1. Pause and Redistribute the Laundry
If the washer is in the middle of a spin cycle and begins shaking violently, pause the cycle if your model allows it.
Spread heavy items evenly around the drum before restarting.
Washing one bulky item by itself often creates an unbalanced load. Adding a few similar towels can sometimes help distribute the weight more evenly.
2. Check That the Washer Is Level
Place a bubble level across the top of the washer from side to side and front to back.
If the machine rocks when you press on the corners, adjust the leveling feet until all four feet make solid contact with the floor.
Once adjusted, tighten the locking nuts (if equipped) so the feet stay in place.
3. Verify Shipping Bolts Were Removed
If your washer was installed recently, check that all shipping bolts have been removed.
Transportation bolts keep the drum rigid during shipping. Leaving them installed can cause severe vibration and may damage the washer.
Consult the installation guide for your specific model if you are unsure where they are located.
For example, Whirlpool provides step-by-step instructions for removing shipping bolts during washer installation in its official support guide: Whirlpool Washer Installation Support.
4. Avoid Overloading
Packing too many clothes into the drum makes it harder for the washer to balance the load during the spin cycle.
Likewise, washing only one heavy blanket or rug can create the opposite problem.
Following the load recommendations in your owner’s manual usually provides the best results.
Regular appliance maintenance can also help prevent performance issues over time. If your dishwasher has started leaving behind white residue, our guide on why dishwashers leave white residue explains the most common causes and practical solutions.
5. Inspect the Floor
Even a properly functioning washer may vibrate on a weak or flexible floor.
If the floor noticeably moves while the washer spins, the flooring itself may be contributing to the problem.
Anti-vibration pads can reduce minor movement on smooth surfaces, but they will not correct structural floor issues or worn suspension components.
6. Listen for Mechanical Problems
If shaking continues after checking the load and installation, pay attention to unusual sounds.
Grinding, scraping, or loud roaring noises may indicate worn bearings or other internal components that require repair.
Those repairs typically involve major disassembly and are best handled by a qualified technician.
Tips to Prevent Excessive Washer Vibration
A few simple habits can reduce vibration and help your washer last longer.
- Wash similar-sized items together whenever possible.
- Avoid washing one heavy blanket by itself.
- Don’t overload the drum.
- Check the leveling feet every few months.
- Keep the washer on a solid, level surface.
- Follow the manufacturer’s recommended load sizes.
- Stop the cycle and redistribute clothes if severe shaking begins.
When to Call a Professional
Some vibration problems cannot be solved by adjusting the load or leveling the washer.
Consider contacting a qualified appliance technician if:
- The washer continues shaking after leveling and balancing the load.
- You hear grinding, roaring, or metal-on-metal noises.
- Water leaks appear underneath the machine.
- The inner drum feels loose when pushed by hand.
- The suspension system or drum supports appear damaged.
Continuing to operate a washer with severe vibration may increase wear on internal components.
FAQ
Is some shaking during the spin cycle normal?
Yes. High-speed spin cycles naturally create some vibration. Small movements are expected, but loud banging or a washer that moves across the floor usually indicates a problem.
Why does my washer only shake when washing blankets?
Large blankets can absorb a significant amount of water and become unevenly balanced during spinning. Washing them with a few similar towels often helps distribute the weight.
Can an uneven floor cause washer vibration?
Yes. Even if the washer itself is working properly, an uneven or flexible floor can amplify vibration during high-speed spinning.
Do anti-vibration pads really work?
They can reduce minor vibration and noise on smooth floors, but they won’t fix installation problems, worn suspension parts, or an unbalanced load.
Can overloading damage a washing machine?
Repeated overloading increases stress on the suspension system, motor, and bearings, which may shorten the appliance’s lifespan over time.
Conclusion
A washing machine that shakes during the spin cycle is often responding to an unbalanced load or an installation issue rather than a major mechanical failure.
Start by checking the simplest possibilities: redistribute the laundry, make sure the washer is level, and confirm that shipping bolts have been removed if the machine is new.
If vibration continues after those checks, worn suspension components or bearing problems become more likely and may require professional service.
Addressing excessive vibration early can help reduce noise, protect your flooring, and prevent unnecessary wear on the washer.
How This Article Was Prepared
This article was researched using manufacturer installation guides, appliance maintenance resources, and publicly available information about washer vibration and balancing.
The content was reviewed and edited by a human. The author did not personally test every washing machine model discussed.
Because installation methods and suspension systems differ between brands and models, always follow your owner’s manual before making adjustments or attempting repairs.
Sources Reviewed
- Manufacturer installation guides for washer leveling and shipping bolt removal
- Appliance troubleshooting resources covering vibration and load balancing
- Product documentation from major washer manufacturers
Editorial Note
This article is intended for routine maintenance and basic troubleshooting. If your washer continues to shake after following the manufacturer’s recommendations, or if you notice leaks, burning smells, or unusual mechanical noises, stop using the appliance until it has been inspected by a qualified technician.
Illustrations in this article are AI-assisted visuals created to help explain maintenance and installation concepts.

James L is the founder and editor of Clever Nest Lab, an independent home care website focused on practical, research-based household advice. He reviews manufacturer guidance, official documentation, and reliable sources to turn useful information into clear, practical guides.
Clever Nest Lab distinguishes between first-hand testing and research-based recommendations. The goal is to help readers better understand common household problems, follow safer cleaning and maintenance practices, and make informed decisions.